Pre-Conclusion
Learn the techniques to become proficient in capturing how to screenshot on Mac! This comprehensive guide provides a thorough coverage of all methods and shortcuts, along with valuable ideas and techniques to boost your productivity and creativity.
Introduction
The screenshot is a fundamental tool in our tech-savvy lives, capturing a precise representation of our screen’s current condition. Knowing how to capture your screen can be quite useful in several situations, such as showcasing your impressive high score, archiving a receipt, or sharing a crucial excerpt from a conversation. This guide is a valuable resource for Mac users who want to become experts in taking screenshots. Now, let’s explore the several methods for how to screenshot on Mac, accompanied by useful advice to enhance your proficiency as a digital user.
Master the Basics: how to Screenshot on Mac
Full-Screen Capture
Capturing your entire screen is as easy as pie. Here’s how you can do it:
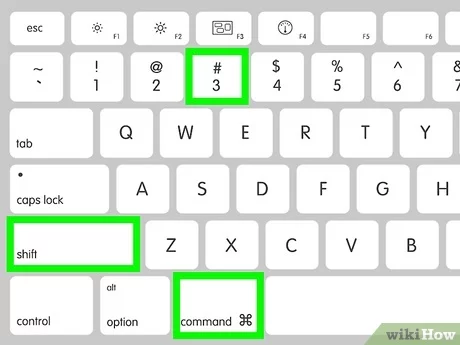
- Press and hold these three keys together: Shift, Command, and 3.
- If you hear a shutter sound (make sure your volume is up!), you’ve successfully taken a screenshot. The screenshot will automatically save to your desktop as a .png file.
Isn’t it a breeze? Now, let’s kick it up a notch!
Partial Screen Capture
Sometimes, you don’t need everything on your screen—just a specific part. Here’s the scoop on how to do that:
- Press and hold Shift, Command, and 4.
- Drag the crosshair to select the area you want to capture. Let go of the mouse or trackpad button to snap the shot.
- You can cancel by pressing Esc (Escape) before you release the button.
This method is perfect when you want to focus on a specific element without revealing everything else on your screen.
Window Capture
Want to capture just one window? No problemo! Follow these steps:
- Press and hold Shift, Command, 4, and then tap the Space bar. The cursor will change to a camera icon.
- Click the window you want to capture. Easy peasy!
Advanced Techniques and Tools
Screenshotting with Preview
Preview isn’t just for viewing PDFs and images; it’s also a nifty tool for taking screenshots! Here’s how you can use Preview to snap your screen:
- Open Preview and navigate to File in the menu bar.
- Select Take Screenshot from the dropdown menu and choose from “From Selection,” “From Window,” or “From Entire Screen.”
Using Preview gives you a bit more control over what you capture before you save it.
Using Third-Party Apps
If the built-in tools aren’t cutting it, there are numerous third-party apps available because that offer advanced features like timed screenshots, annotation capabilities, and more. Apps like Snagit or Lightshot can be great alternatives if you need more functionality.
Tips and Tricks
- Storage: By default, screenshots save to your desktop, but you can change the save location with a simple Terminal command or by using a third-party app.
- Clipboard: Want to save your screenshot to the clipboard instead of a file? Just add Control to any of the shortcuts mentioned above. You can then paste it into any app, such as Word or Photoshop.
- Annotations: After taking a screenshot, double-click the file to open it in Preview. Here, you can add text, shapes, or even your signature.
FAQs
Q1: How do I take a screenshot on a MacBook with a Touch Bar?
A1: Press Shift, Command, 6 to capture the entire Touch Bar.
Q2: Can I record a video of my screen?
A2: Absolutely! Press Shift, Command, 5 to access the screen recording options. You can record the entire screen or just a selected portion.
Q3: Are screenshots saved in high resolution?
A3: Yes, screenshots are saved in the resolution of your screen, which means they are in high quality.


One Comment